

Shooting with a handgun regularly presents the shooter with great challenges. Many small details, some of which are not visible from the outside, must be observed in order to handle the handgun safely and effectively. This article provides an overview of the key skills and techniques of practical handgun shooting. Before going into more detail on the specific skills, it is first necessary to take a closer look at the scope: the air pistol shooter requires different techniques than, for example, a soldier, hunter, or police officer. For the purpose of this article, the scope of practical shooting is assumed. This term includes shooting in application areas such as hunting, law enforcement or dynamic sports disciplines. It should be noted at this point that the article is limited purely to basic techniques. In addition, it should be mentioned that the article focuses on pistol shooting. Although many aspects also apply to revolvers, there are some differences (especially in the grip technique), which will be discussed in more detail in another article.
Always at the forefront of any shooting training: safety
Probably the most important skill in handling handguns (and firearms in general) is compliance with safety rules. Especially when dealing with handguns in the field of practical shooting, the utmost caution is required because, unlike long guns, they can be swung much more easily and, in addition, the sometimes very dynamic use in practical shooting opens up many sources of danger. The basis for this is provided by the four safety rules developed by Jeff Cooper:
- Always treat all firearms as if they are loaded
- Never point a gun at something you do not want to shoot at (muzzle discipline)
- Keep your finger off the trigger until your sights are on the target
- Be certain of your target and what is around and behind it; never shoot at anything you haven't confidently identified.
Following these rules guarantees safe handling of the gun. In addition, it is important to have good equipment. In the field of practical pistol shooting, this includes first of all a good and safe holster that covers the trigger. Here, modern variants made of Kydex are to be given preference over classic leather holsters. Clothing should also be chosen accordingly. Open pockets in the hip area of jackets, loose cords or zippers and anything else the gun can get tangled in should be avoided. The foundation of a good and safe shot is a stable stance, a good grip, a proper sight picture, and a clean trigger pull. These four elements form the basis of any shooting discipline and are particularly important in many respects in the field of practical pistol shooting.
The stance when shooting with a handgun
Figuratively speaking, the stance forms the basis on which all other techniques are built. If you have a wobbly base, this will make it much more difficult to shoot. Recoil management also depends in part on the stance type. Since in practical pistol shooting you usually shoot with both handes, you must keep the upper body relatively frontal to the target. In principle, your legs should be aligned so that the foot on the side of the shooting hand is slightly offset to the rear. The legs are not fully extended, but slightly bent. Your feet must be approximately shoulder-width apart. This so-called "fighter stance" offers several advantages. It builds a natural type of recoil management. A stance in which both feet are parallel on one line is different; here the shooter must work more actively to tame recoil (especially when firing several shots).
In the stance described at the beginning, on the other hand, the leg that is moved backwards provides greater stability in the recoil direction, and on the other hand it naturally shifts the center of gravity further forward. Both support a stable and relaxed firing. In addition, in dynamic scenarios, movements such as running or changing position can be carried out much more easily from this starting position.
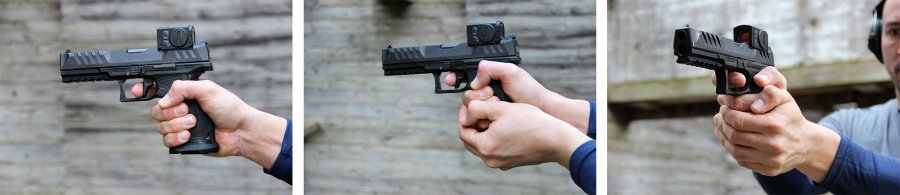
The grip: holding the gun correctly
Gripping the gun is one of the most important and, unfortunately, also the most frequently improperly or incorrectly executed part of handgun shooting. The grip is built up on the crook of the thumb of the shooting hand. This must be placed as high as possible on the back of the grip in order to get as close as possible to the barrel bore axis. This is so important because energy release, and thus the recoil, occurs at barrel height. The closer you get to this line, the better you can control recoil because muzzle flip is minimized. The little finger, the ring finger and the middle finger are then used to build up counterpressure from the front of the grip. Here it is important not to simply squeeze tightly, but rather to clamp the grip between the fingers and the ball/crook of the thumb, primarily by applying pressure from the little finger. Last but not least, the thumb of the shooting hand remains unbent. First of all, this makes one thing: room! A frequently seen mistake is that the thumb stays at the side of the grip. This is problematic because it leaves no room for the second hand to support the gun. Therefore, the thumb should first be moved slightly to the side of the gun and make room. As a side effect, this brings additional pressure upwards and raises the grip even higher.
The complete grip is then built up with the aid of the support hand. The heel of the hand is brought as far as possible into the still free area of the grip. Here, too, it is important to ensure that the hand is brought as far up as possible on the gun. Beginners in particular tend to grip too low here. The slide catch lever can serve as a rough guideline: the heel of the hand should rise at about the height of its lower edge. The thumb should then point forward parallel to the slide. The remaining fingers enclose the firing hand.
As a rough guide, you can imagine a 45-degree angle with the fingers pointing down between the grip and the slide. Pressure should then be applied to the grip in such a way that the fingers are not simply squeezed tightly together: rather, the pressure should come from the forearms through firm and locked wrists. Figuratively, you can imagine building up the pressure as if you were trying to crush a walnut between the heels of your hands.
It is important that you do not completely get clanched, but try to build up the pressure from good structures and not pure muscle strength. The arms and their position help to build up these structures. A mistake that is often seen here is completely stretched arms. The problem is that with fully extended arms, hardly any pressure can be built up between the hands. In addition, recoil can be poorly absorbed, but rather seeks the natural way up and makes the entire arms flip along with the gun. It is better here if the arms are slightly bent. Firstly, this improves recoil management, and secondly, it is a very good way to build up pressure on the gun: from the shoulders through the elbows and forearms, wrists and hands. How much the arms are bent and especially the position of the elbows (rather high or lower) is then a bit of personal preference and must be tested individually. However, it is important that the principle and the structure behind it are understood.
The sight picture: aiming with the pistol

Once the stance and grip fit, it is important to build up a proper sight picture. There are basically two options here: the classic open sights with rear and front sights, and the modern reflex sight. Shooting with rear and front sights is done by centering the front sight in the rear notch and having the rear and front sights at the same height. However, this process alone is problematic because three objects (rear sight, front sight, and target) must be aligned in relation to the eye. The human eye can only see one of these objects in focus. This means that either the target or the sights are in focus. In most cases, you will opt for the sights, or more precisely the front sight, because smaller aligning deviations can have a significant effect when aiming over the shooting distance.
Another problem when aiming with a rear sight is that you can shoot with both eyes open or one eye closed. Classically, the variant of a closed eye is known from the field of static sport shooting, where it also has its justification. However, in the practical use of a handgun, in unclear, possibly also dangerous or dynamic situations, this has two significant disadvantages: You lose a large part of your field of view and restrict your peripheral vision considerably. This can be crucial in a dangerous situation. Also, in such stressful scenarios, it is very unnatural to close one eye. So if you are interested in a more practical use of the handgun, it is better to train shooting with both eyes open.
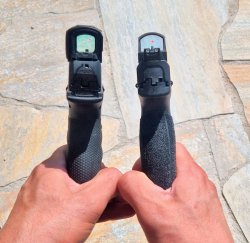
Reflex sights offer a way out of the dilemma described above. These are small target optics that can be mounted on a handgun. They have no magnification and a luminous aiming dot is mirrored in the optic, with which the target can be aimed. Their key advantage is that you shoot with both eyes open, and the focus is on the target. In short, the shooter looks at his/her target with both eyes open and focuses on it. The shooter then brings the red dot into his/her field of view and places it over the target. Since reflex sights are parallax-free, it does not matter whether the illuminated dot appears in the center of the optic or not. This type of aiming offers considerable advantages over open sights and ultimately represents the way humans naturally aim: they have the target in sight. We all know this from throwing: whether it's a snowball or a spear, we're looking at the target, not the object we're throwing. In addition, reflex sights offer considerable advantages over rear sights in the case of declining eyesight.
One problem area to be mentioned briefly at this point is the sight picture. It is a matter of how accurate my sight picture must be in order to fulfill a given task. The relationship between time, target size and distance is crucial. To illustrate, when firing at a large target (such as an A3 sheet of paper) at a short distance of a few meters, my sight picture does not have to be particularly good in order to hit the target. If, on the other hand, I want to hit a smaller target (i.e. a DIN A5 sheet) at a greater distance (e.g. 25 meters), I need a clean sight picture. Naturally, the better the sight picture, the more time you need. Here, it is a matter of trial and error and consciously working with different sight pictures to develop a feeling for a sight picture that is adequate for the situation.
Releasing the shot: trigger pull and firing
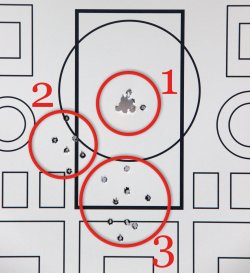
2. The typical hit pattern in the case of trigger errors by a right-handed shooter – the muscle tension due to the bending of the trigger finger causes the hits to move low and to the left.
3. Low shots are often the result of an anticipated recoil, where the gun is already slightly pressed downward against recoil shortly before the actual shot is fired.
Finally, the trigger is pulled and the shot is fired. To put it bluntly, only the finger needs to be bent, but a lot can still go wrong here. The main problem of trigger pull is that the shooter, by bending the trigger finger, brings tension into the complete hand and the sight alignment is disrupted at the moment of the trigger pull. This tension can be well illustrated by extending ypur fingers without the gun and trying to move the index finger alone. You notice that the other fingers want to move with it and that muscle tension occurs in the whole hand. Therefore, you must train to be able to move your index finger without putting tension in the rest of your hand. Beginners can start by slowly increasing the pressure on the trigger steadily and evenly. Dry practice is also an option here. More experienced shooters can perform this process faster and faster.
The second classic problem is not directly related to trigger pull, but it comes into play at precisely this moment: anticipating the shot. The shooter anticipates the bang and recoil that will occur at the moment of firing and actively works against it. This becomes problematic if the shooter anticipates the shot and pushes the gun slightly forward and downward a fraction of a second before the actual shot is fired. This results in low shots caused by working against the recoil too early. Here is a proven way to detect this error: a fellow shooter loads the magazine and inserts a buffer cartridge at a random position. When the buffer cartridge is “fired”, the lack of recoil makes it easy to see if the shooter is already moving the gun before the click. Being aware of the error is then also the first step towards improvement.
The techniques presented here form a foundation for the necessary skills of practical shooting with handguns. In detail, of course, there are many more subtleties and alternative possibilities. However, to present all these would go beyond the scope of a basic article. And in addition, there are other skills that are needed for pistol practical use: for example, gun drawing, quick firing strings, magazine changes, one-handed shooting and the like.


